前言
自己日常工作中几乎天天都在使用ChatGPT,觉得这些工具很大程度提升了工作效率 ,节约了很多上搜索和测试时间,十分期待它将来演化的路程。
自己也了解过很多的相关的知识,最近想着最近的AIGC大模型这么火,怎么不自己部署试一下试试呢?想着后面能自己做微调训练出更有意思更有价值的东西出来。
所以把自己的主力PC 做了一个双系统,然后挑一个开源大模型本地部署 首先挑一个能运行的开源模型,选中了ChatGLM2-6B 模型 ,由清华大学开源的中英双语对话模型 。部署门槛比较低,性能不错。
硬件环境:
CPU:i7-9700F
内存:DDR4 32G
显卡:2070S 8G
软件环境(新装):
Ubuntu 22.04 TLS
开始
安装环境
简要说明要安装哪些东西
主要分为三大块: 1.英伟达显卡驱动,Linux系统默认不会安装相关显卡驱动,需要自己安装。
2.CUDA(Compute Unified Device Architecture) ,是NVIDIA公司开发的一组编程语言扩展、库和工具,让开发者能够编写内核函数,可以在GPU上并行计算。
3.CuDNN(CUDA Deep Neural Network library),是NVIDIA公司开发的深度学习开发者提供的加速库,帮助开发者更快实现深度神经网络训练推理过程。
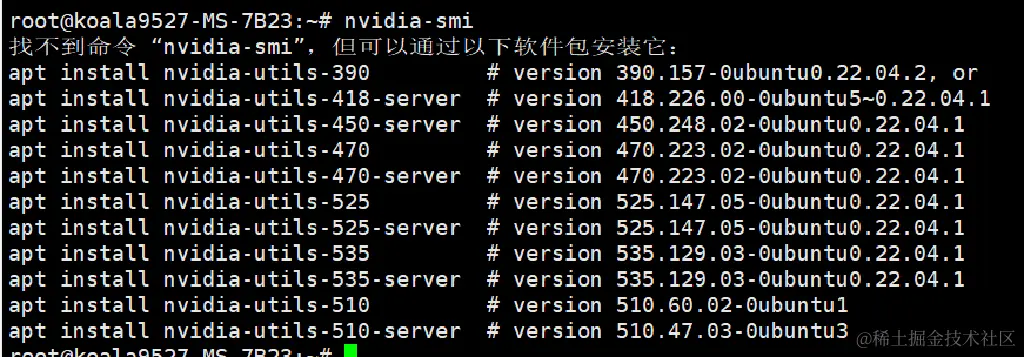
先看下自己的显卡到底有没有驱动:nvidia-smi

再看下有没有cuda 驱动:nvcc -V
也是没有安装相关驱动,当然也没有
那么开始安装
NVIDIA驱动
先更新一下软件源: sudo apt-get update
查看显卡硬件支持的驱动类型:ubuntu-drivers devices
安装一个最推荐的驱动:
可以自动安装推荐版本: sudo ubuntu-drivers autoinstall
报错了。 修改DNS:
bash
sudo vim /etc/systemd/resolved.conf
重启服务生效:
bash
systemctl restart systemd-resolved
systemctl enable systemd-resolved
又出现报错:
apt-get update 试一下再安装 可以了,安装成功:
重启( sudo reboot)之后再查看驱动:
成功了,提示CUDA Version: 12.2 表示这个显卡最高可以支持CUDA12.2版本
CUDA
先安装CUDA Toolkit 下载地址:developer.nvidia.com/cuda-toolki…
根据官网提示在线安装试试:
arduino
wget https://developer.download.nvidia.com/compute/cuda/12.2.0/local_installers/cuda_12.2.0_535.54.03_linux.run
sudo sh cuda_12.2.0_535.54.03_linux.run
提示报错: Failed to verify gcc version. See log at /var/log/cuda-installer.log for details.
先加忽略试试看:
arduino
sudo sh cuda_12.2.0_535.54.03_linux.run --override
输入:accept
还没完,需要根据提示 添加环境变量
bash
===========
= Summary =
===========
Driver:   Not Selected
Toolkit:  Installed in /usr/local/cuda-12.2/
Please make sure that
 -   PATH includes /usr/local/cuda-12.2/bin
 -   LD_LIBRARY_PATH includes /usr/local/cuda-12.2/lib64, or, add /usr/local/cuda-12.2/lib64 to /etc/ld.so.conf and run ldconfig as root
To uninstall the CUDA Toolkit, run cuda-uninstaller in /usr/local/cuda-12.2/bin
***WARNING: Incomplete installation! This installation did not install the CUDA Driver. A driver of version at least 535.00 is required for CUDA 12.2 functionality to work.
To install the driver using this installer, run the following command, replacing <CudaInstaller> with the name of this run file:
    sudo <CudaInstaller>.run --silent --driver
Logfile is /var/log/cuda-installer.log
bash
vim ~/.bashrc
文件末尾添加以下几行:
bash
source ~/.bashrc
最后验证一下:nvcc -V
cuDNN
接下来安装cuDNN 项目的pytorch 版本是>2.0
进官网看看cudnn 和cuda的版本对应关系:
developer.nvidia.com/rdp/cudnn-a…
CUDA 12.2 对应的是一下几个版本的cudnn
cudnn 官方下载地址:developer.nvidia.com/rdp/cudnn-a…
sudo dpkg -i cudnn-local-repo-ubuntu2204-8.9.5.30_1.0-1_amd64.deb
安装示例复制软件源的key:
bash
sudo cp /var/cudnn-local-repo-ubuntu2204-8.9.5.30/cudnn-local-FB167084-keyring.gpg /usr/share/keyrings/
更新软件源: sudo apt-get update 接下来还要安装运行时库,开发者库,代码示例:
这里需要指定具体的CUDA版本和cuDNN版本,上面的CUDA和cuDNN版本分别为:12.2.0 和 8.9.5.30 所以:
ini
sudo apt-get install libcudnn8=8.9.5.30-1+cuda12.2
sudo apt-get install libcudnn8-dev=8.9.5.30-1+cuda12.2
sudo apt-get install libcudnn8-samples=8.9.5.30-1+cuda12.2
执行完成验证安装:
bash
cp -r /usr/src/cudnn_samples_v8/ $HOME
cd $HOME/cudnn_samples_v8/mnistCUDNN
make clean && make
./mnistCUDNN
make 命令时 提示 找不到命令 “make” 那么就安装 apt install make
然后又报错:
bash
rm -rf *o
rm -rf mnistCUDNN
CUDA_VERSION is 12020
Linking agains cublasLt = true
CUDA VERSION: 12020
TARGET ARCH: x86_64
HOST_ARCH: x86_64
TARGET OS: linux
SMS: 50 53 60 61 62 70 72 75 80 86 87 90
g++: No such file or directory
nvcc fatal   : Failed to preprocess host compiler properties.
>>> WARNING - FreeImage is not set up correctly. Please ensure FreeImage is set up correctly. <<<
[@] /usr/local/cuda/bin/nvcc -I/usr/local/cuda/include -I/usr/local/cuda/include -IFreeImage/include -ccbin g++ -m64 -gencode arch=compute_50,code=sm_50 -gencode arch=compute_53,code=sm_53 -gencode arch=compute_60,code=sm_60 -gencode arch=compute_61,code=sm_61 -gencode arch=compute_62,code=sm_62 -gencode arch=compute_70,code=sm_70 -gencode arch=compute_72,code=sm_72 -gencode arch=compute_75,code=sm_75 -gencode arch=compute_80,code=sm_80 -gencode arch=compute_86,code=sm_86 -gencode arch=compute_87,code=sm_87 -gencode arch=compute_90,code=sm_90 -gencode arch=compute_90,code=compute_90 -o fp16_dev.o -c fp16_dev.cu
[@] g++ -I/usr/local/cuda/include -I/usr/local/cuda/include -IFreeImage/include -o fp16_emu.o -c fp16_emu.cpp
[@] g++ -I/usr/local/cuda/include -I/usr/local/cuda/include -IFreeImage/include -o mnistCUDNN.o -c mnistCUDNN.cpp
[@] /usr/local/cuda/bin/nvcc -ccbin g++ -m64 -gencode arch=compute_50,code=sm_50 -gencode arch=compute_53,code=sm_53 -gencode arch=compute_60,code=sm_60 -gencode arch=compute_61,code=sm_61 -gencode arch=compute_62,code=sm_62 -gencode arch=compute_70,code=sm_70 -gencode arch=compute_72,code=sm_72 -gencode arch=compute_75,code=sm_75 -gencode arch=compute_80,code=sm_80 -gencode arch=compute_86,code=sm_86 -gencode arch=compute_87,code=sm_87 -gencode arch=compute_90,code=sm_90 -gencode arch=compute_90,code=compute_90 -o mnistCUDNN fp16_dev.o fp16_emu.o mnistCUDNN.o -I/usr/local/cuda/include -I/usr/local/cuda/include -IFreeImage/include -L/usr/local/cuda/lib64 -L/usr/local/cuda/lib64 -L/usr/local/cuda/lib64 -lcublasLt -LFreeImage/lib/linux/x86_64 -LFreeImage/lib/linux -lcudart -lcublas -lcudnn -lfreeimage -lstdc++ -lm
继续安装相关的软件:
arduino
sudo apt-get install libfreeimage3 libfreeimage-dev
还是继续一样报错,显然没有安装g++编译库,想找到具体问题,结果在NVIDIA论坛找到的解决方案:
arduino
sudo apt-get install g++ freeglut3-dev build-essential libx11-dev libxmu-dev libxi-dev libglu1-mesa libglu1-mesa-dev
最后成功了!!!
部署
下载项目
官方Git项目地址:https://github.com/THUDM/ChatGLM2-6B
bash
git clone https://github.com/THUDM/ChatGLM2-6B
cd ChatGLM2-6B
还需要提前安装一些软件
apt install python3-pip git curl
这里就不使用conda了直接安装相关依赖
ruby
pip install -r requirements.txt -i https://mirrors.aliyun.com/pypi/simple/
安装Git lfs(Large File Storage) Git 的扩展,实现大文件的版本管理支持
原理是通过项目根目录下的.gitattributes文件指定哪些文件用专门的LFS文件服务器里,和Git仓库存储位置分开。
git lfs 官方指南:github.com/git-lfs/git…
ruby
curl -s https://packagecloud.io/install/repositories/github/git-lfs/script.deb.sh | sudo bash
sudo apt-get install git-lfs
切换一个文件夹执行Clone大模型相关的模型:git clone https://huggingface.co/THUDM/chatglm2-6b
然后看下载速度带宽占用,需要下一个软件nethogs:
sudo apt install nethogs
nethogs -d 5
每秒两三M左右,13G左右,理论上差不多十分钟,实际上不止
然后等待下载完成后进行如项目目录测试 (cd chatglm2-6b)
命令行测试
试一下命令行启动: python3 进入交互式命令行
ini
from transformers import AutoTokenizer, AutoModel
tokenizer = AutoTokenizer.from_pretrained("THUDM/chatglm2-6b-int4", trust_remote_code=True)
model = AutoModel.from_pretrained("THUDM/chatglm2-6b-int4", trust_remote_code=True, device='cuda')
response, history = model.chat(tokenizer, "你好", history=[])
print(response)
实际上AutoModel.from_pretrained 加载模型加载了很久
然后出现了报错:
arduino
. Make sure to double-check they do not contain any added malicious code. To avoid downloading new versions of the code file, you can pin a revision.
pytorch_model.bin: 100%|█████████████████████████████████████████████████████████████████████████████████████████████████████████████████████████████████████████████████████| 3.92G/3.92G [18:36<00:00, 3.51MB/s]
Traceback (most recent call last):
  File "<stdin>", line 1, in <module>
  File "/usr/local/lib/python3.10/dist-packages/transformers/models/auto/auto_factory.py", line 479, in from_pretrained
    return model_class.from_pretrained(
  File "/usr/local/lib/python3.10/dist-packages/transformers/modeling_utils.py", line 2675, in from_pretrained
    model = cls(config, *model_args, **model_kwargs)
  File "/root/.cache/huggingface/modules/transformers_modules/THUDM/chatglm2-6b-int4/66ecaf1db3a5085714e133357ea4824b69698743/modeling_chatglm.py", line 856, in __init__
    self.transformer = ChatGLMModel(config, empty_init=empty_init, device=device)
  File "/root/.cache/huggingface/modules/transformers_modules/THUDM/chatglm2-6b-int4/66ecaf1db3a5085714e133357ea4824b69698743/modeling_chatglm.py", line 756, in __init__
    self.encoder = init_method(GLMTransformer, config, **init_kwargs)
  File "/usr/local/lib/python3.10/dist-packages/torch/nn/utils/init.py", line 52, in skip_init
    return module_cls(*args, **kwargs).to_empty(device=final_device)
  File "/usr/local/lib/python3.10/dist-packages/torch/nn/modules/module.py", line 1039, in to_empty
    return self._apply(lambda t: torch.empty_like(t, device=device), recurse=recurse)
  File "/usr/local/lib/python3.10/dist-packages/torch/nn/modules/module.py", line 810, in _apply
    module._apply(fn)
  File "/usr/local/lib/python3.10/dist-packages/torch/nn/modules/module.py", line 810, in _apply
    module._apply(fn)
  File "/usr/local/lib/python3.10/dist-packages/torch/nn/modules/module.py", line 810, in _apply
    module._apply(fn)
  [Previous line repeated 1 more time]
  File "/usr/local/lib/python3.10/dist-packages/torch/nn/modules/module.py", line 833, in _apply
    param_applied = fn(param)
  File "/usr/local/lib/python3.10/dist-packages/torch/nn/modules/module.py", line 1039, in <lambda>
    return self._apply(lambda t: torch.empty_like(t, device=device), recurse=recurse)
  File "/usr/local/lib/python3.10/dist-packages/torch/_refs/__init__.py", line 4681, in empty_like
    return torch.empty_permuted(
torch.cuda.OutOfMemoryError: CUDA out of memory. Tried to allocate 108.00 MiB. GPU 0 has a total capacty of 7.75 GiB of which 93.25 MiB is free. Including non-PyTorch memory, this process has 6.98 GiB memory in use. Of the allocated memory 6.87 GiB is allocated by PyTorch, and 1.58 MiB is reserved by PyTorch but unallocated. If reserved but unallocated memory is large try setting max_split_size_mb to avoid fragmentation.  See documentation for Memory Management and PYTORCH_CUDA_ALLOC_CONF
根据issue调整量化命令,我还以为直接改量化模型名称就行:
把
ini
model = AutoModel.from_pretrained("THUDM/chatglm2-6b-int4", trust_remote_code=True, device='cuda')
调整成:
ini
model = AutoModel.from_pretrained("THUDM/chatglm2-6b-int4", trust_remote_code=True).quantize(4).cuda()
解释是:如果在 from_pretrained 里传入 device='cuda',会把量化前的模型构建在 GPU上。 ,显卡只有8G 跑不了。
所以现在就可以了:
问了两个问题,显存涨了300多M:
平均一个问题涨了100M显存占用,回答内容还不错,比我想象中要聪明一点点
WEB测试
找到官方的项目地址:github.com/THUDM/ChatG…
因为我是从Hugging Face 上下载的没有web测试的代码文件
找到web_demo2.py 根据自己的显卡显存调整一下量化等级代码:
ini
...
@st.cache_resource
def get_model():
    tokenizer = AutoTokenizer.from_pretrained("THUDM/chatglm2-6b-int4", trust_remote_code=True)
    model = AutoModel.from_pretrained("THUDM/chatglm2-6b-int4", trust_remote_code=True).quantize(4).cuda()
    # 多显卡支持,使用下面两行代替上面一行,将num_gpus改为你实际的显卡数量
    # from utils import load_model_on_gpus
    # model = load_model_on_gpus("THUDM/chatglm2-6b", num_gpus=2)
    model = model.eval()
    return tokenizer, model
...
运行命令并访问:
arduino
streamlit run web.py
大模型的生成结果的文件流 可以通过streamlit流式传输 ,不用跟命令行一样等待全部结果生成出来返回,速度非常快,每秒大概四十个中文字符,体验非常棒~
总结
整个环境搭建流程还算比较顺利,没有卡很久 ,然后大模型问答的结果内容比我想象中要好很多,感觉比ChatGPT3.5只差了一点点 ,主要是对话回复得非常快,这是在第三方的在线部署的模型是体验不到的,web版自己已经够玩了,后面可以尝试找些数据做微调训练了,然后对接API试试,这次简单的部署教程就到这里,微调训练敬请期待~
链接:https://juejin.cn/post/7305473943573233701
来源:稀土掘金
著作权归作者所有。商业转载请联系作者获得授权,非商业转载请注明出处。
