一、安装宝塔
打开SSH端,输入指令:yum install -y wget && wget -O install.sh http://download.bt.cn/install/install_6.0.sh && sh install.sh
二、编译安装Nginx(必须为编译安装)
下载nginx-dav-ext-module模块,将解压后的文件夹放到/www/server/nginx/src文件夹下(没有的话需要自己创建)
在初次安装宝塔后通常会安装Nginx,此时大多数人都是“极速安装”,但是这里不行。
进入软件商店→卸载重新安装→编译安装
安装完成后,后天使用命令:nginx -v,查看模块安装是否成功
configure arguments: --user=www --group=www --prefix=/www/server/nginx --add-module=/www/server/nginx/src/ngx_devel_kit --add-module=/www/server/nginx/src/lua_nginx_module --add-module=/www/server/nginx/src/ngx_cache_purge --add-module=/www/server/nginx/src/nginx-sticky-module --with-openssl=/www/server/nginx/src/openssl --with-pcre=pcre-8.43 --with-http_v2_module --with-stream --with-stream_ssl_module --with-stream_ssl_preread_module --with-http_stub_status_module --with-http_ssl_module --with-http_image_filter_module --with-http_gzip_static_module --with-http_gunzip_module --with-ipv6 --with-http_sub_module --with-http_flv_module --with-http_addition_module --with-http_realip_module --with-http_mp4_module --with-ld-opt=-Wl,-E --with-cc-opt=-Wno-error --with-ld-opt=-ljemalloc --with-http_dav_module --add-module=/www/server/nginx/src/nginx-dav-ext-module,出现红字内容即表明webdav模块安装成功
三、新建网站
四、修改网站配置文件
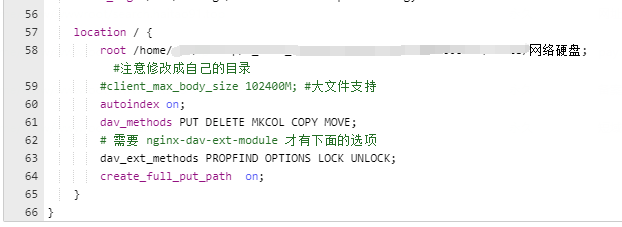
在配置文件末尾添加如下代码:
- location / {
- root /www/wwwroot/webdav.qian.blue; #注意修改成自己的目录
- #client_max_body_size 102400M; #大文件支持
- autoindex on;
- dav_methods PUT DELETE MKCOL COPY MOVE;
- # 需要 nginx-dav-ext-module 才有下面的选项
- dav_ext_methods PROPFIND OPTIONS LOCK UNLOCK;
- create_full_put_path on;
- }
五、设置密码
在“网站目录”中设置,即Webdav的账号和密码。
六、客户端挂载webdav到本地
windows系统推荐RaiDrive
安卓系统推荐CX文件管理
网络–远程存储–webdav,输入信息即可连接。

