精彩评论
- 张麻子是杂种(5天前)
从有人以来就没有比张麻子更邪恶 张口闭口为人民,害死几千万人还为人民,为自己的皇位还差不多,...
评:深度解析《让子弹飞》 al2359(3年前 (2023-02-06))
求科学离线插件,谢谢!34401355@qq.com
评:改版梅林固件安装SS【shadowsocks】科学上网插件教程al2359(3年前 (2023-02-06))
求科学离线插件,谢谢!!!
评:改版梅林固件安装SS【shadowsocks】科学上网插件教程
本文所使用的系统为 Centos 8 系统,略过了系统的安装部分,使用的Hadoop版本为Hadoop v2.10.0版本。
在安装JDK的过程中,使用的是软件包管理器直接安装的方式,当然你也可以采用编译的方式,这里就不再赘述。
yum install java-1.8.0-openjdk* -y
使用查看版本的命令,查看是否安装成功
[[email protected] hadoop]$ java -version
openjdk version "1.8.0_252"
OpenJDK Runtime Environment (build 1.8.0_252-b09)
OpenJDK 64-Bit Server VM (build 25.252-b09, mixed mode)
如果你的输出结果与上面的类似,就说明你已经成功安装了JDK
Hadoop的启动和一些其他的操作依赖于环境变量,所以你需要先配置JAVA_HOME变量。 编辑 /etc/profile 文件,在最下面加入
export JAVA_HOME=/usr/lib/jvm/java-1.8.0-openjdk-1.8.0.252.b09-3.el8_2.x86_64
export HADOOP_HOME=/opt/moudle/hadoop-2.10.0export PATH=$PATH:$JAVA_HOME/bin
需要注意的是,上面 JAVA_HOME 中的路径里 java-1.8.0-openjdk-1.8.0.252.b09-3.el8_2.x86_64 ,可能与你安装的路径不一致,如果你和我一样是采用yum方式直接安装的JDK,cd到/usr/lib/jvm/目录后,使用ls命令列出当前目录的所有文件夹,将上面这个名称修改为例看到的 java-1.8.0-openjdk-1.8-xxxx 即可。
[[email protected] hadoop-2.10.0]$ source /etc/profile
[[email protected] hadoop]$ echo $JAVA_HOME<br>/usr/lib/jvm/java-1.8.0-openjdk-1.8.0.252.b09-3.el8_2.x86_64
这里下载的是Hadoop的预编译版本,省去编译步骤
https://downloads.apache.org/hadoop/common/hadoop-2.10.0/hadoop-2.10.0.tar.gz
在/opt目录下新建source和moudle目录,并且使用chown命令将目录所有者修改为你要运行Hadoop的用户,我这里默认用户就是hadoop
sudo mkdir module
sudo mkdir software
sudo chown -R hadoop:hadoop module/ source/
确定你已经成功的修改了目录权限
[[email protected] opt]$ ls -l
total 0
drwxr-xr-x. 3 hadoop hadoop 27 Jul  7 19:37 moudle
drwxr-xr-x. 2 hadoop hadoop 34 Jul  7 19:37 source
将下载的tar传入 /opt/source目录,然后将内容解压至 /opt/moudle目录
tar -zxvf /opt/source/hadoop-2.10.0.tar.gz -C /opt/moudle
检查是否与下面的输出一致
[[email protected] moudle]$ cd hadoop-2.10.0/
[[email protected] hadoop-2.10.0]$ ls
LICENSE.txt  NOTICE.txt  README.txt  bin  data  etc  include  lib  libexec  logs  sbin  share
如同配置JAVA_HOME一样,在/etc/profile中加入以下的内容
export HADOOP_HOME=/opt/moudle/hadoop-2.10.0
在刚刚配置Java的PATH后面加入一些东西,修改后的内容可能为
export PATH=PATH:JAVA_HOME/bin:HADOOPHOME/bin:HADOOP_HOME/sbin
然后在Shell中执行 source /etc/profile 更新下环境变量即可。
修改/opt/moudle/hadoop-2.10.0/etc/hadoop 中的core-site.xml配置文件
<?xml version="1.0" encoding="UTF-8"?>
<?xml-stylesheet type="text/xsl" href="configuration.xsl" ?>
<!--
  Licensed under the Apache License, Version 2.0 (the "License");
  you may not use this file except in compliance with the License.
  You may obtain a copy of the License at

    http://www.apache.org/licenses/LICENSE-2.0

  Unless required by applicable law or agreed to in writing, software
  distributed under the License is distributed on an "AS IS" BASIS,
  WITHOUT WARRANTIES OR CONDITIONS OF ANY KIND, either express or implied.
  See the License for the specific language governing permissions and
  limitations under the License. See accompanying LICENSE file.
-->

<!-- Put site-specific property overrides in this file. -->

<configuration>
  <property>
    <name>fs.defaultFS</name>
    <value>hdfs://hadoop1:9000</value>
  </property>
  <property>
    <name>hadoop.tmp.dir</name>
    <value>/opt/moudle/hadoop-2.10.0/data/tmp</value>
  </property>
</configuration>
将模板配置文件/opt/moudle/hadoop-2.10.0/etc/hadoop/mapred-site.xml.template 复制一份为同目录下的 mapred-site.xml,然后进行修改
<?xml version="1.0"?>
<?xml-stylesheet type="text/xsl" href="configuration.xsl"?>
<!--
  Licensed under the Apache License, Version 2.0 (the "License");
  you may not use this file except in compliance with the License.
  You may obtain a copy of the License at

    http://www.apache.org/licenses/LICENSE-2.0

  Unless required by applicable law or agreed to in writing, software
  distributed under the License is distributed on an "AS IS" BASIS,
  WITHOUT WARRANTIES OR CONDITIONS OF ANY KIND, either express or implied.
  See the License for the specific language governing permissions and
  limitations under the License. See accompanying LICENSE file.
-->

<!-- Put site-specific property overrides in this file. -->

<configuration>
<!-- 指定MR运行在YARN上 -->
<property>
  <name>mapreduce.framework.name</name>
  <value>yarn</value>
</property>
</configuration>
配置yarn-site.xml
<!-- reducer获取数据的方式 -->
<property>
 <name>yarn.nodemanager.aux-services</name>
 <value>mapreduce_shuffle</value>
</property>
<property>
<name>yarn.resourcemanager.hostname</name>
<value>这里配置为你的服务器hostname</value>
</property>
</configuration>
hadoop namenode -format
启动NN:hadoop-daemon.sh start namenode
启动DN:hadoop-daemon.sh start datanode
启动ResourceManager:yarn-daemon.sh start resourcemanager
启动NodeManager:yarn-daemon.sh start nodemanager
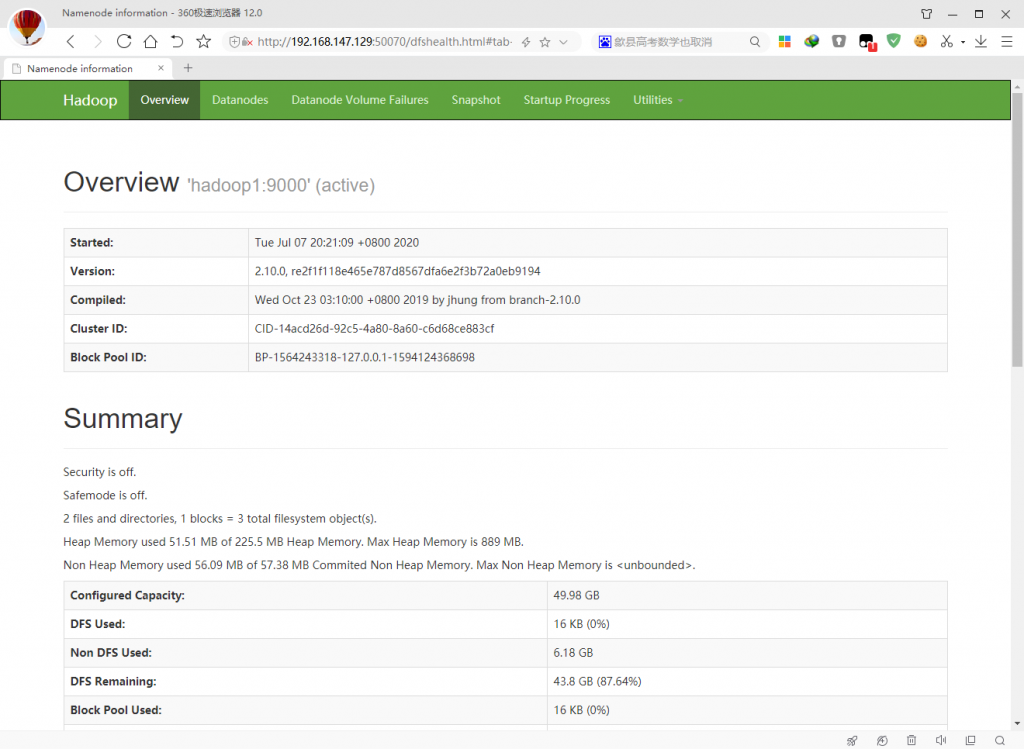
分别访问 http://主机hostname:8088 http://主机hostname:50070


成功访问Hadoop的HTTP服务,说明配置已经成功了!
「梦想一旦被付诸行动,就会变得神圣,如果觉得我的文章对您有用,请帮助本站成长」
上一篇:VMware/VPS虚拟机上安装 x86版本DD-WRT
从有人以来就没有比张麻子更邪恶 张口闭口为人民,害死几千万人还为人民,为自己的皇位还差不多,...
评:深度解析《让子弹飞》求科学离线插件,谢谢!34401355@qq.com
评:改版梅林固件安装SS【shadowsocks】科学上网插件教程求科学离线插件,谢谢!!!
评:改版梅林固件安装SS【shadowsocks】科学上网插件教程