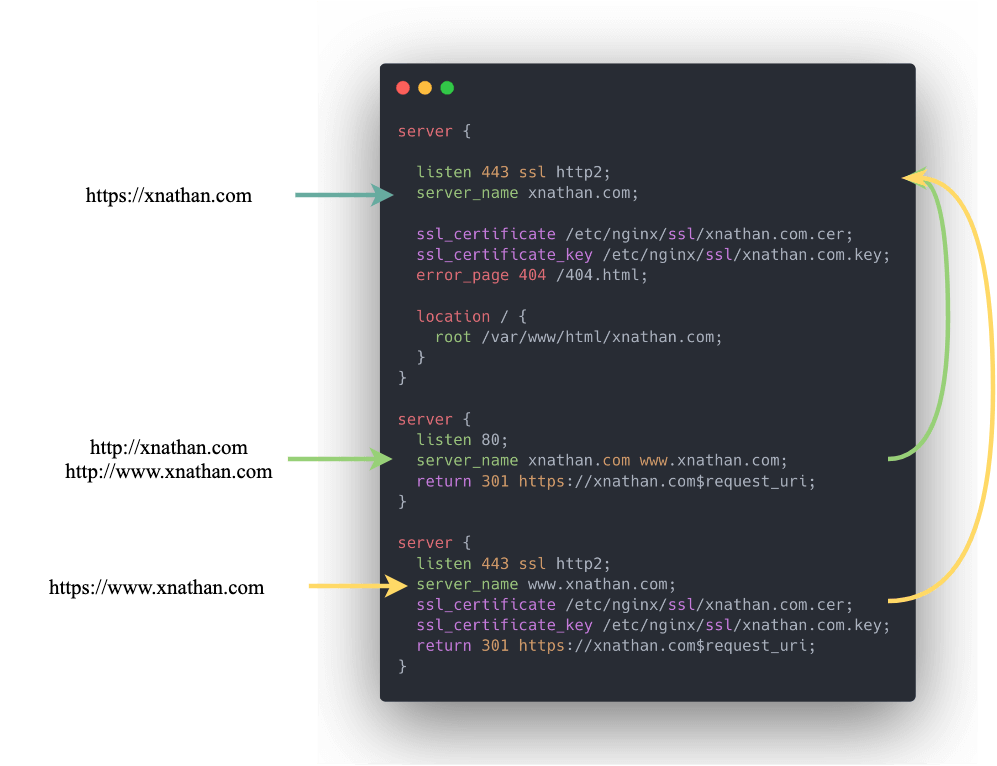
博客迁移之后, 希望把博客域名从 www.xnathan.com 改成 xnathan.com。
这样链接看起来更简洁,移动端搜索结果展示更为友好。
由于搜索引擎和其他博客文章的引用中还有一些旧域名(www.xnathan.com)的索引,可以利用 nginx 的 301 重定向机制,把旧域名过渡到新域名。
博客现在用 nginx 部署,只需要修改配置,实现两个功能:
http 跳转到 https
www 域名跳转到非 www 域名
首先设置端口和域名分为 443、xnathan.com,所有访问 https://xnathan.com 的请求都使用这个虚拟主机配置,正常返回网页。
 1
 2
 3
 4
 5
 6
 7
 8
 9
10
11
12
13
|
server {

  listen 443 ssl http2;
  server_name xnathan.com;

  ssl_certificate /etc/nginx/ssl/xnathan.com.cer;
  ssl_certificate_key /etc/nginx/ssl/xnathan.com.key;
  error_page 404 /404.html;

  location / {
    root /var/www/html/xnathan.com;
  }
}
|
接下来再分别处理其他几种链接的跳转请求。
监听 80 端口,http://xnathan.com 和 http://www.xnathan.com 两个域名的访问会采用此配置,最后跳转到 https://xnathan.com。
1
2
3
4
5
|
server {
  listen 80;
  server_name xnathan.com www.xnathan.com;
  return 301 https://xnathan.com$request_uri;
}
|
需要实现 http://www.xnathan.com、https://www.xnathan.com 跳转到目标网址。
上一步的配置已经把 http://www.xnathan.com 跳转好了,那只需要配置 https://www.xnathan.com 跳转的情况。
因为用到 https,这一段中同样要加上 SSL 证书的配置。
1
2
3
4
5
6
7
|
server {
  listen 443 ssl http2;
  server_name www.xnathan.com;
  ssl_certificate /etc/nginx/ssl/xnathan.com.cer;
  ssl_certificate_key /etc/nginx/ssl/xnathan.com.key;
  return 301 https://xnathan.com$request_uri;
}
|
配置设置好之后,需要重启一下 nginx:
1
2
3
|
$ sudo systemctl restart nginx
# 或者
$ sudo nginx -s reload
|
经过上面的配置,不管用哪个协议或哪个域名访问本站,最终都会跳转到 https://xnathan.com。

直接访问 https://xnathan.com 返回 200。
 1
 2
 3
 4
 5
 6
 7
 8
 9
10
11
|
$ curl -I https://xnathan.com
HTTP/2 200
server: nginx
date: Mon, 22 Apr 2019 06:20:49 GMT
content-type: text/html
content-length: 21117
last-modified: Sat, 20 Apr 2019 09:52:15 GMT
vary: Accept-Encoding
etag: "5cbaebcf-527d"
strict-transport-security: max-age=15768000
accept-ranges: bytes
|
其他情况都返回 301,跳转 https://xnathan.com
1
2
3
4
5
6
7
8
|
$ curl -I http://xnathan.com
HTTP/1.1 301 Moved Permanently
Server: nginx
Date: Mon, 22 Apr 2019 06:21:06 GMT
Content-Type: text/html
Content-Length: 178
Connection: keep-alive
Location: https://xnathan.com/
|
1
2
3
4
5
6
7
8
|
$ curl -I http://www.xnathan.com
HTTP/1.1 301 Moved Permanently
Server: nginx
Date: Mon, 22 Apr 2019 06:21:18 GMT
Content-Type: text/html
Content-Length: 178
Connection: keep-alive
Location: https://xnathan.com/
|
1
2
3
4
5
6
7
|
$ curl -I https://www.xnathan.com
HTTP/2 301
server: nginx
date: Mon, 22 Apr 2019 06:20:05 GMT
content-type: text/html
content-length: 178
location: https://xnathan.com/
|
附上完整配置,根据自己的需要修改域名和路径。
 1
 2
 3
 4
 5
 6
 7
 8
 9
10
11
12
13
14
15
16
17
18
19
20
21
22
23
24
25
26
27
|
server {

  listen 443 ssl http2;
  server_name xnathan.com;

  ssl_certificate /etc/nginx/ssl/xnathan.com.cer;
  ssl_certificate_key /etc/nginx/ssl/xnathan.com.key;
  error_page 404 /404.html;

  location / {
    root /var/www/html/xnathan.com;
  }
}

server {
  listen 80;
  server_name xnathan.com www.xnathan.com;
  return 301 https://xnathan.com$request_uri;
}

server {
  listen 443 ssl http2;
  server_name www.xnathan.com;
  ssl_certificate /etc/nginx/ssl/xnathan.com.cer;
  ssl_certificate_key /etc/nginx/ssl/xnathan.com.key;
  return 301 https://xnathan.com$request_uri;
}
|
「梦想一旦被付诸行动,就会变得神圣,如果觉得我的文章对您有用,请帮助本站成长」


共 0 条评论关于"Nginx 配置 301 实现强制 https 和域名跳转"
最新评论